


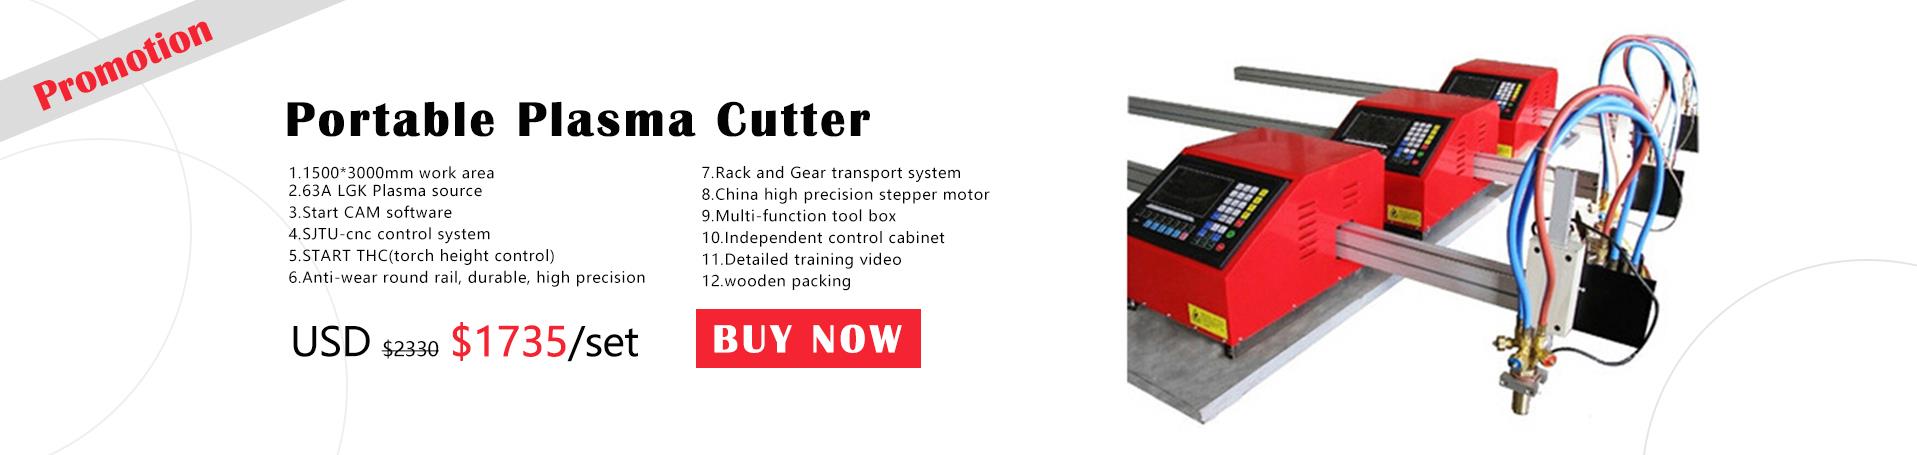


How to use the plasma cutting machine?
Release Time : 2022-09-07 View Count : 次The content of this article is to introduce the use of plasma cutting machine HOW mainly, and the summary is very comprehensive.
Let's explain the precautionary measures used by the plasma cutting machine.
1: Preparation before operation
After connecting the device (please pay special attention. Please connect the safe ground line). If everything is normal, you can do the following steps:
Close the power switch and turn on the host. Note: The input AC current is about 65A, not too small. Otherwise, the host will not work properly. At the same time, make sure that the fans of the host need to meet the requirements. Otherwise, you need to adjust the input power phase until the steering is matched.
Place the "power switch" of the host in the "Opening" position. At this point, the "power indicator" light is lit. However, you should not turn on the "lack of phase orders". Otherwise, there is a shortage of three -phase power supply, so you need to check and solve it. Note: If the host case is not connected to the safe ground line, the lack of a phase indicator may show an error result.
Supply gas to the host and place the "disconnection" switch at the "test gas" and "test gas" position. At this point, it is necessary to spray the compressed air into the torch nozzle. In 3 minutes of the test, there is no need to turn on the red light with "insufficient air pressure". Checking the pressure indicator value of the "air overconutening agent" is not less than 0.42MPa. The gas source is less than 0.45MPa and the flow is less than 300L/ min. Also, the air supply road may be too small and the air pressure may be too large. If there is a problem, you need to check and solve it.
Furthermore, be careful: "Air -spin pressure" failure must be adjusted again if it is imbalanced. The adjustment method is as follows. The handle rotates clockwise, increases the pressure, and decreases in other cases. The pressure gauge is adjusted to 0.42MPa. At this point, place "Cut" and "Test gas" at the "Cut" position.
2: Preparation before operation
In order to reduce the consumption of SEENTION energy and improve the life of nozzle and electrode, "low grade" cutting must be used as much as possible. If the "Cut -thick selection" switch is placed in the "high end", it is necessary to use a non -contact cut type (excluding special situations) and prefer a watering torch.
If you need to replace the switching gear of "thicker selection", you must first turn off the host power switch to prevent damage to machine parts.
When disassembling or moving the host host, turn the power to the power to prevent danger.
Before the Attachtion Attachment, you must first turn off the host power switch. Components (torch cutting, grinded wires, electrodes, nozzles, distributions, caps, protection covers, etc.) can be attached to the host. Do not turn on the torch switch repeatedly to avoid damage to ARC systems or related elements.
If you need to start with an arc cutting from the center of Workpiece, you can cut stainless steels with a thickness of 20 mm or less and cut them directly. This method puts a torch at the starting point of cutting, creates a workpiece plane at an angle of about 75 °, a torch nozzle axis, and turns the torch switch and attracts the arc perforation; Must adjust to 90 °. After cutting the work, usually cut it along the sewing direction. However, if the above thickness needs to be cut and cut, it is necessary to make a small hole at the starting point of the cutting (unlimited diameter) and cut from a small hole. Otherwise, it is easy to damage the torch nozzle.
The continuous work rate of the host host is 70 % (the "thicker selection" switch is placed at a low end, and the continuous work is nearly 100 %). If the continuous work time is too long and the host temperature is too high, the temperature protection system will be automatically shut down and you need to cool down for about 20 minutes to continue working.
If the compassed air pressure is less than 0.22MPa, the device must be protected and shut down immediately. At this point, it is necessary to maintain the gas supply system. After the disability, the pressure recovery 0.45MPa can continue to operate.
If the three phase input power supply is missing, the host cannot work properly, and some models have a red light that does not have a phase order. You need to eliminate the disability before cutting properly.
The water -cooled model needs to fill the water tank and insert a pump power plug.
It is necessary to rotate the power supply to the "boot" position, such as the "insufficient air pressure" indicator light, and adjust it to 0.45 MPa as needed. Therefore, the "insufficient air pressure" index was destroyed. Fan steering must be in the direction of the logo. Water -cooler water pumps need to meet the requirements. Otherwise, the "insufficient water pressure" indicator will be turned on and the input power phase will be adjusted.
Depending on the thickness of the workpiece, the "Cut -thick selection" switch is assigned to the corresponding position, and an appropriate cutting torch is selected. It is prohibited to exceed the rated current range. Otherwise, it will be damaged. Put the torch disconnection at the starting point of the workpiece and press the torch switch. If it is not ignited at once, you can press the torch switch again. Ark succeeds and starts cutting.
For 4 to 8 hours of work (at the time interval to discard dry air drying), water filter screws must be loosened according to the "air filter" and discharged. It causes obstacles.
If the loop of the water -cooled system is insufficient, the host will be protected. At this time, it is necessary to check and solve it according to the method described in the related chapter. The aquarium returns smoothly to the water outlet to keep using the water -cooled torch.
If you work in a cold environment, you need to pay attention. If the surrounding temperature is lower than the freezing point, water is not allowed. Otherwise, the circulating water cold system will not work properly. It may be damaged.
3: How to use a plasma cutting machine
3.1 Manual non -contact cutting:
3.1.1 The distance between the torch lowling wheels is adjusted from the distance between the workpiece plane to 3 to 5 mm. (When the host is cut, the "thick selection" switch increases).
3.1.2 Open the torch switch and ignite the plasma arc. After cutting the workpiece, move the average speed in the cutting direction. The cutting speed is as follows. If it is too late, it will affect the incision quality and destroy the arc.
3.1.3 After cutting, turn off the torch switch and wait for the ion arc to disappear. At this point, the compressed air is delayed and sprayed to cool the torch. After a few seconds, stop spray automatically. Move the torch and complete the entire cutting process.
3.2 Manual contact type disconnection
3.2.1 For the "thicker selection" switchlond, a single machine is disconnected.
3.2.2 Cut the torch -zle at the start point of the workpiece, turn on the torch switch, ignite the plasma arc, cut the workpiece, and move along the seam direction.
3.2.3 After cutting, the torch switch is turned on and closed. At this point, the compressed air is still sprayed. After a few seconds, stop automatically. Move the torch and complete the entire cutting process.
3.3 Automatic cutting
3.3.1 Automatic cutting is mainly suitable for cutting thick workpieces. Select the position of the "thick selection" switch.
3.3.2 After removing the torch low ring wheel, the torch cut and the semi -automatic cutting machine are solid, and there is a connector in the random attachment.
3.3.3 Connect the half -automatic cutting machine. Attach the guide rail or radius according to the shape of the workpiece (if the direct line cut rail is cut or arc, select the Radius lever).
3.3.4 If the torch switch plug is a dial, replace it with a remote control switch plug (preparing for random attachment).
3.3.5 Adjust the appropriate walking speed according to the thickness of the workpiece. Then, place the "reversal" and "smooth" switch in the semi -automatic cutting machine in the cut direction.
3.3.6 Adjust the distance between the nozzle and the workpiece to 3-8mm, and adjust the central position of the nozzle into the starting strip of the workpiece seam.
3.3.7 Open the remote control switch. After cutting the work, turn on the semi -automatic cutting electric machine switch and cut. In the early stage of cutting, you need to pay attention to the seam at any time and adjust it according to the appropriate cutting speed. Note that the two machines are always normal.
3.3.8 After cutting, turn off the remote control switch and the semi -automatic cutting electric machine switch. At this point, the entire cutting process is completed.
The above is a detailed introduction of how to use an ion cutting machine. I hope it will be useful for everyone.
